-
Product Management
Software Testing
Technology Consulting
-
Multi-Vendor Marketplace
Online StoreCreate an online store with unique design and features at minimal cost using our MarketAge solutionCustom MarketplaceGet a unique, scalable, and cost-effective online marketplace with minimum time to marketTelemedicine SoftwareGet a cost-efficient, HIPAA-compliant telemedicine solution tailored to your facility's requirementsChat AppGet a customizable chat solution to connect users across multiple apps and platformsCustom Booking SystemImprove your business operations and expand to new markets with our appointment booking solutionVideo ConferencingAdjust our video conferencing solution for your business needsFor EnterpriseScale, automate, and improve business processes in your enterprise with our custom software solutionsFor StartupsTurn your startup ideas into viable, value-driven, and commercially successful software solutions -
-
- Case Studies
- Blog
How to Test UX Design: UX Problem Discovery, Hypothesis Validation & User Testing
Customer-driven product development implies designing and developing a product based on customer feedback. The match between actual product capabilities and end users’ expectations defines the success of any software project.
At RubyGarage, we create design mockups, wireframes, and prototypes to communicate assumptions regarding how your app should look and perform. User testing is then needed to validate these ideas before the actual product development starts. Why? Because early UX validation takes significantly less time and effort than rebuilding a ready-made product.
Learn how to test UX design ideas with this ultimate practical guide from RubyGarage UX experts.
What is UX validation?
In a broad sense, UX validation is the process of collecting evidence and learning around some idea with the aim of conducting experiments and user testing to make informed decisions about product design. You can validate a business idea, a user experience, or a specific problem with an existing product, or you can choose the most viable solution among all available options.
There are two approaches to UX validation:
- Waterfall: Validation of the whole concept at the final release
- Lean: Validation of individual hypotheses through multiple experiments

Lean UX validation is preferable for startups due to lower risks of failure compared to the Waterfall approach and optimized budget distribution.
Why do you need UX validation?
The validation phase of UX research gives the product team an understanding of what the future (or existing) product should be like to satisfy the end user. It helps the team:
- Understand customer value more profoundly. Get precise feedback on each feature and every blocker on the user’s way to conversion.
- Align the product concept with user expectations. There’s no better way to form the correct product value for customers than listening to what real users want.
- Find product–market fit. You need to be on the same page with your target audience to build a viable product that will bring desired business results.
- Save budget and resources. Early validation per iteration helps reveal mismatches between features and customer expectations so you don’t spend time and money on the wrong features and UX flows. This way, you’ll invest resources with maximum efficiency.
You can use a lot of theory about UX validation methods to run the design validation cycle with your team. However, very few teams know how to test a UX design in practice. It’s rather challenging to organize all activities correctly and effectively. The RubyGarage UX design team has a well-thought-out UX validation workflow that we’ve polished through years of working on our own and clients’ products. Here is our practical step-by-step guide on running the UX validation process based on our in-house workflow.
Step 1: UX problem discovery
UX problem discovery involves researching the problem space. During this step, the team identifies the problems to be explored and solved after collecting evidence and determining what to do next.
1. Organizational preparation
The problem discovery process can differ depending on the project stage (whether a new or existing product is under development), the team structure, management, etc. However, here are the main preparation steps you should arrange before starting the UX validation process:
- Define the purpose and objectives for conducting UX validation. What product design flows do you need to validate and what UX problems do you need to test? We recommend using the Project Charter template to outline these items.
- Define stakeholders to participate in the UX validation process. Identify each process participant and their areas of responsibility. We highly recommend elaborating stakeholders’ roles through the Stakeholders Register, Stakeholders Influence Matrix, or Stakeholders RACI Matrix.

Stakeholder register. contains contact information for each stakeholder such as their name, category, analysis, job title, and address. A stakeholder register may look approximately like this:

In the Stakeholder influence matrix, you can/should structure stakeholders by two essential criteria: power (influence) and interest. Power defines the impact of each stakeholder from the decision-making standpoint. The level of interest is how likely a stakeholder is to take action to exercise their power.

Stakeholder RACI matrix serves to identify who should be responsible, accountable, consulted, and informed:

To structure the roles and responsibilities of stakeholders, use RACI ranging based on the following characteristics:
- Responsible: Who will be doing the task?
- Accountable: Who is responsible for making decisions? Who is going to approve it?
- Consulted: Who can tell me about this task, activity, etc?
- Informed: Who has to be kept informed about the progress? Whose work depends on this task, activity, etc?
As a result, you’ll get an outline of your UX validation process with all required participants defined and ready for the following activities.
2. Kick-off workshop meeting preparations
The kick-off workshop meeting is conducted to align the entire team around the challenge in order to form a UX validation plan with activities each team member (stakeholder) will perform.
Here is how to prepare for the kick-off workshop step by step:
- Define the workshop goals and participants. Define the workshop goals and activities to achieve those goals. Use the Stakeholder Register to outline the required participants.
- Prepare a kick-off workshop agenda to give participants a clear overview of the meeting activities, the duration of each step, and who will lead each task.
- Share the agenda with all participants before the workshop via established communication channels (email, Slack, etc.) to ensure they receive it.
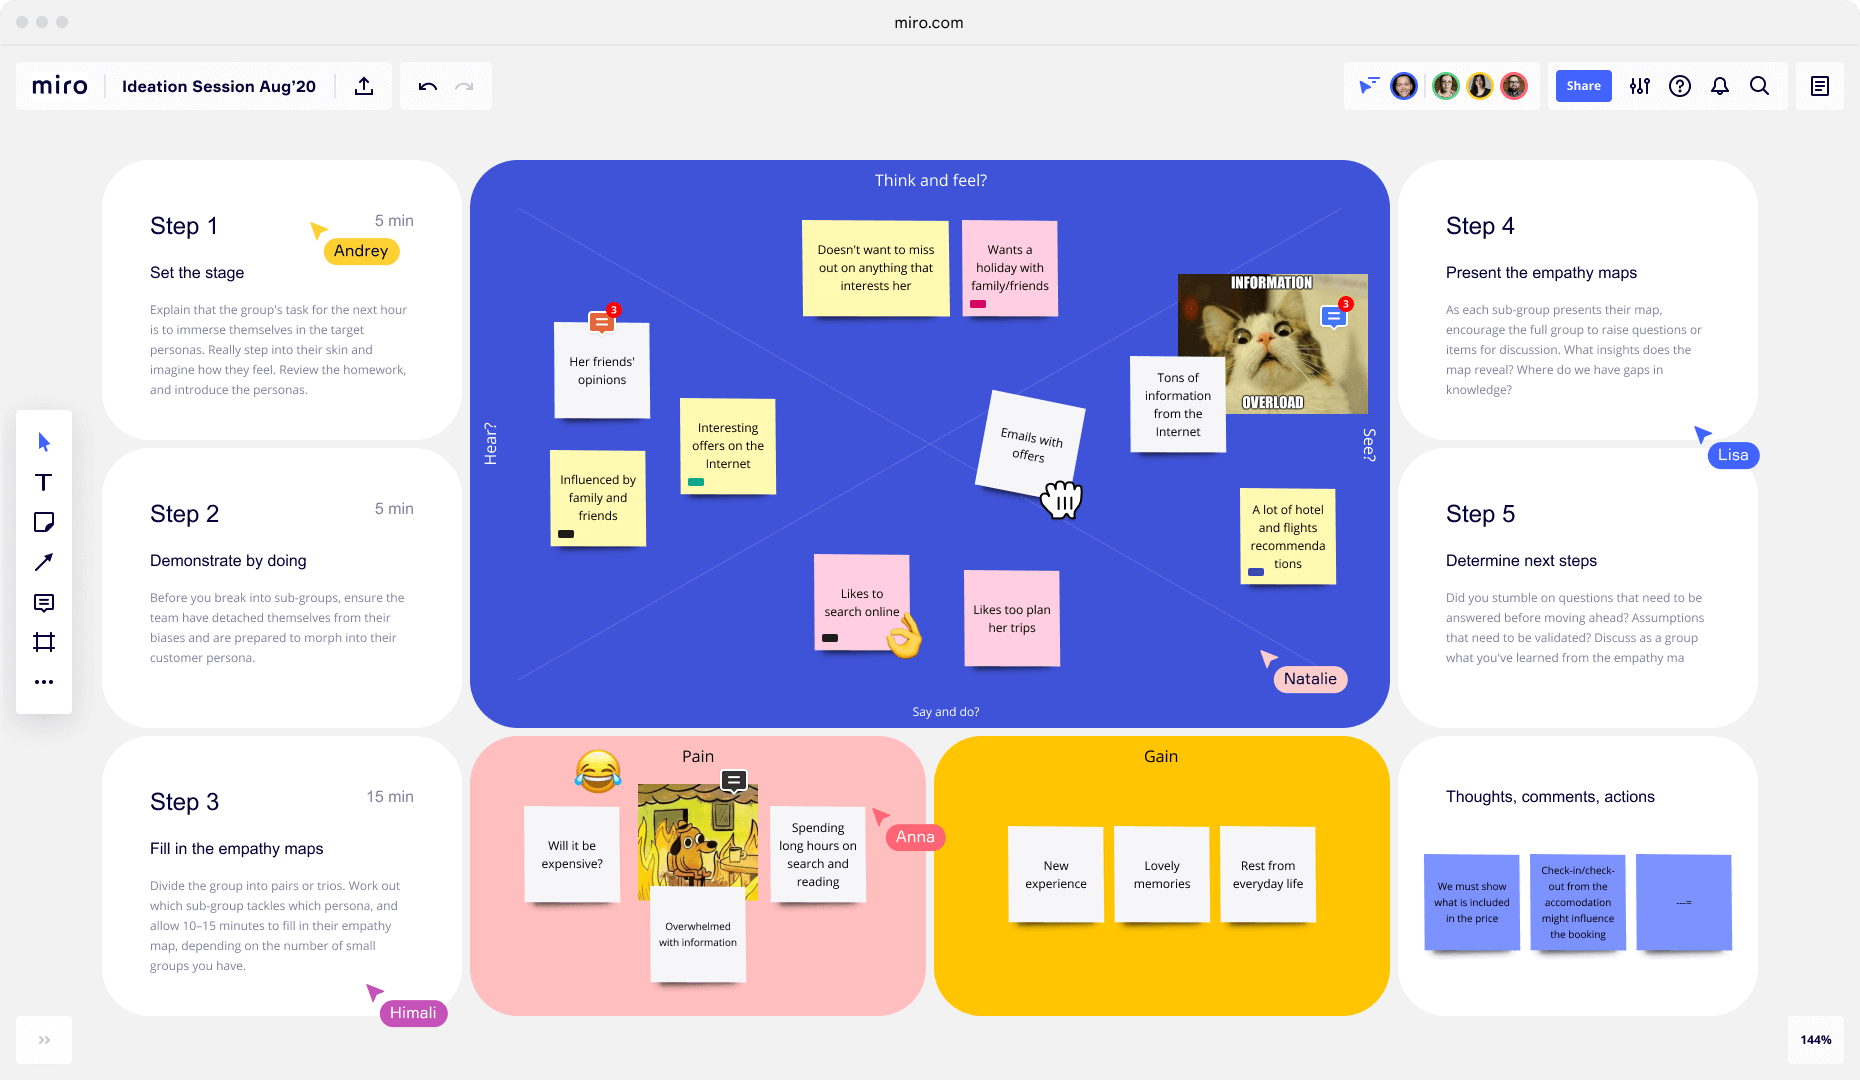
- Create a workshop canvas to structurize and organize all activities and prepare the workspace for documenting the progress.
A workshop canvas is required so that the facilitator can effectively conduct the kick-off workshop meeting and gain the target results through the range of activities. At RubyGarage, we use the Miro whiteboard tool to map templates for all planned activities.
3. Conducting a kick-off workshop meeting
Run the following activities during the kick-off workshop:
- Reframe the initial problem. Analyze the problem from three perspectives (desirability, feasibility, and viability) to more deeply understand the issues related to the briefing. We recommend using the Abstraction laddering tool. Put the problem statement in the middle. Go with ’why?’ questions up the ladder to get to the root cause of each challenge. Go down the ladder with ’how?’ to explore the issue more precisely and reveal sub-problems.
- Map existing knowledge and assumptions. Map out what you already know as a fact and what is still unknown in the context of discussed problems.
- Plan activities and pick tools to reach your objectives. Think about the practical activities to do in each discovery phase and pick those that are just enough to achieve your goals. Create a shared sprint plan that clearly defines the time frame for each activity, the participants responsible for each item, and how they will collaborate across roles. Put all milestone meetings, sprint ceremonies, and deadlines into a plan. Further, you’ll need to revisit this plan to track progress and adjust further steps if necessary.
- Fill in the after-meeting section in the agenda file to outline the meeting results and document all findings.
- Prepare a UX validation plan and approve it with the client and stakeholders. The final deliverable of the kick-off workshop meeting is a UX validation plan that includes the list of activities for the UX design validation process; the tasks backlog for each activity; and assignees, participants, and estimates for each task.
We recommend that you prepare a UX validation plan in the form of a presentation with clear descriptions for each activity, including its purpose, goals, execution, and deliverables. By doing so, it will be clear to the client and other decision-makers what you will do and why.
Step 2: User behavior analysis
During the kick-off meeting, you defined the UX problems that should be researched and validated. It’s essential to collect more data on how users currently interact with the product’s interface to understand these problems from the user’s point of view and prepare for user interviews. This is called behavioral analysis. This type of user testing helps you find answers to the following questions:
- Where do users click within the product screens?
- Where do users get stuck?
- What screen areas and interface elements cause problems with the user experience?
- How long does it take users from first click to conversion?
- How can you nudge users to take actions?
- What types of UI elements are most effective?
Analyzing behavior includes the following steps:
- Select analysis goals, KPIs, and metrics. Outline your plan for behavior analysis and pick relevant tools to accomplish your goals. Define the time frame and people responsible for conducting the research.
- Define user journeys for analysis. Users accomplish their actions via multiple scenarios through the product interface. Clearly outline user journeys for analysis to track the current activity and roadblocks. Map these user journeys in your UX validation canvas.
- Set up the required tools. Follow the selected tool setup and configuration guides to make them ready to track user activity.
- Set unique identifiers for each user to distinguish the activity of a specific user.
- Collect and analyze results. Based on recorded activity, define patterns in user behavior. Outline deviations in expected user behavior and define problem areas in the UX flow.
- Develop UX problem hypotheses. Formulate UX problems and define UX flows that must be validated during user interviews.
The deliverable at this step is a behavior analysis report to share results with the client and outline your findings for the next steps.
Tools for behavior analysis

The right tool depends on the specifics of your product and your research subject. Different tools present user behavior statistics in different formats, from visualized heatmaps in Hotjar to statistical charts in Amplitude. Here is a short overview of the most popular user behavior testing tools:
- Mixpanel: A powerful mobile app analytics tool that helps you collect and analyze data on specific actions and events set up in advance.
- Hotjar: We prefer using Hotjar to identify UX-related problems causing user drop-offs. Hotjar provides heatmaps, session recordings, and surveys to understand customer behavior.
- Heap: This tool doesn’t require upfront configuration. It automatically tracks each user’s activity and aggregates the collected data in various reports.
- Amplitude: A comprehensive analytics tool to analyze user behavior with a view to multiple marketing metrics including retention, conversion rate, and lifetime value.
Step 3: UX hypotheses validation
Over the previous steps, you got a set of UX hypotheses about what causes problems for your users, where they get stuck, what user flows to improve, and so on. You now need evidence to determine if these hypotheses are valid and worth further elaboration. There are different ways to test UX design hypotheses. At RubyGarage, we prefer in-depth interviews due to their informative value. Here is how our UX audit team approaches this step.
1. Select the right users for testing
Define who from the product’s customer base or target audience should participate in user interviews.
- Define user personas. Create a typical description of each category of customer to be interviewed. Decide whether you need to interview people from various demographics, with different experience, etc. Document the defined personas.
- Define sample quantity. Select how many users you need for each persona to receive enough representative information to validate hypotheses. It all depends on the type of your study, the variety of user patterns, and how people use your product. The Norman Nielsen Group recommends 40 participants for most quantitative studies to obtain statistically reliable results.
- Recruit enough participants. You should find participants that match your target audience. You can get them from among your teammates and coworkers (internal recruiting), or you can look for suitable interviewees outside your company (external recruiting). If you engage participants internally, aim at employees not in the product team to get objective feedback. If you go for external training, focus on crowded places like malls or coffee shops to look for participants that represent your target audience. To speed up the recruitment process and find relevant participants for UX validation interviews, use specialized platforms like User Interviews or Ethnio. Both of these platforms offer an extensive database of vetted research participants with the ability to filter by multiple parameters.
- Define methods of user allocation. Interviews can be conducted in person or remotely via phone, video call, or chat. Interviewees should be motivated to participate and provide high-quality insights.
When describing user personas, focus on their characteristics and experience using your product. Here is a user persona template for your reference:

2. User interview design
Getting ready for user interviews takes some time. Having all visuals, questions, and forms prepared in advance ensures interviews will run smoothly and that participants will feel comfortable, guided, and engaged for effective interaction. When preparing for user interviews, focus on the following:
- Collect user data about actual users’ experiences with your product
- Collect insights into what users think about your product
- Reveal real UX problems that users face
- Define user pains, gains, wants, needs, and wishes related to the product’s UX solution
Keep in mind those criteria when preparing for interviews through the following steps:
- Prepare visual materials. Get a clickable prototype, working system version, or other visuals to use for your interviews. Define the strict order of showing visual materials and create a separate document with links to all visuals in the proper order.
- Prepare the interview structure. Determine the sequence of interview steps with the appropriate timing for each step.
- Prepare the user interview script. Define the questions for the interview in the proper sequence.
- Allocate the necessary number of users. Schedule the required number of interviewees and set up personal meetings depending on the selected allocation method (remote or in-house).
- Prepare a form for gathering feedback. This form must be filled out to sum up the findings after each interview session.
3. Running user interviews
Once you’ve created all required documents and scheduled meetings (or virtual sessions), begin running interviews:
- Conduct an interview with each participant. Go through the interview questions, following the set order and timing.
- Fill in all results in a feedback gathering form. Within one hour after each interview session, fill in the interview feedback form with your observations and information collected from the interviewee.
- Prepare a user interview report. Summarize your observations, insights, and data collected during user interview sessions in a report. Prepare analytical conclusions based on the collected data and share them with core stakeholders and the client. Define the most crucial insights gathered during the interview for the next UX validation activities.
One approach for processing user interview findings is Affinity mapping:

To follow this UX validation method:
- Record all notes or observations in a document (this can be a Google Document or a Miro board with sticky notes).
- Look for patterns in your observations and group them accordingly.
- Create a group for each pattern or theme.
- Give each group a name.
If you validate a range of hypotheses during user interviews, you can run a hypothesis-driven analysis combined with Affinity mapping, grouping the findings for and against specific hypotheses:

Step 4: Form a list of UX problem hypotheses
After the problem discovery and user testing phases, you can form a backlog of UX problem hypotheses. Based on this backlog, the UX design team should ideate solutions during the next steps of UX design validation. Formulate your hypothesis using the problem hypothesis framework:

Each hypothesis should contain a proposed solution, the definition of success (a goal whose completion defines that the solution is successful), and evidence of your statement (facts and data collected during user behavior analysis and user testing).
Final thoughts
As a result of the first part of the UX design validation process, you get a defined list of UX problems and some hypotheses of how to solve them. Instead of vague ideas, you get grounded reasons for making improvements to your product’s UX design. The next step is generating potential solutions and choosing the most viable one for implementation. We uncover these steps in Practical Guide to UX Design Validation Part 2: Problem Definition and Solution Validation.
FAQ
-
UX design validation is essential when you develop the design for a new product or solve the usability problems in the existing solution. Determining the most suitable UX design approach before the implementation helps save time, budget, and team resources and prevent the product’s failure on delivery and release stages.
-
Depending on the project complexity and scope of challenges, it may take up to a couple of weeks. Most of this time is spent organizing the required activities and analyzing the obtained results.
-
You should define your target audience and recruit participants who match your customer personas. We recommend looking for suitable interviewees outside your product team to get objective feedback on the research questions. The best option is to use specialized platforms like User Interviews or Ethnio.


