-
Product Management
Software Testing
Technology Consulting
-
Multi-Vendor Marketplace
Online StoreCreate an online store with unique design and features at minimal cost using our MarketAge solutionCustom MarketplaceGet a unique, scalable, and cost-effective online marketplace with minimum time to marketTelemedicine SoftwareGet a cost-efficient, HIPAA-compliant telemedicine solution tailored to your facility's requirementsChat AppGet a customizable chat solution to connect users across multiple apps and platformsCustom Booking SystemImprove your business operations and expand to new markets with our appointment booking solutionVideo ConferencingAdjust our video conferencing solution for your business needsFor EnterpriseScale, automate, and improve business processes in your enterprise with our custom software solutionsFor StartupsTurn your startup ideas into viable, value-driven, and commercially successful software solutions -
-
- Case Studies
- Blog
How to Integrate Stripe Checkout in Your Rails App
Stripe is a recognized payment gateway that provides a well-documented API for integrating Stripe into Ruby on Rails applications. This article will walk you through the entire process of integrating Stripe with a Rails app.
Stripe is PCI-compliant, which is very convenient. Stripe automatically saves critical payment data on its own servers and implements necessary security standards, such as encryption of credit card data.
To add the Stripe Checkout gateway to your Rails app, follow these steps:
- Create a developer account on Stripe’s website.
- Install the Stripe gem in your project using Bundler.
- Configure Stripe keys.
- Create routes, the charges controller, and the Stripe charges service object.
We’ll concentrate on the Ruby on Rails backend, so you’ll need to create the payment form manually. For this article, we’ll use Stripe Checkout. But you can also consult the Stripe website for what the standard payment form might look like and create a custom form when needed.
Create a Developer Profile on Stripe
As we mentioned earlier, you’ll need your own profile on Stripe's website to obtain the API keys for development and production. Stripe’s API keys will be necessary to test the integration of the payment gateway.
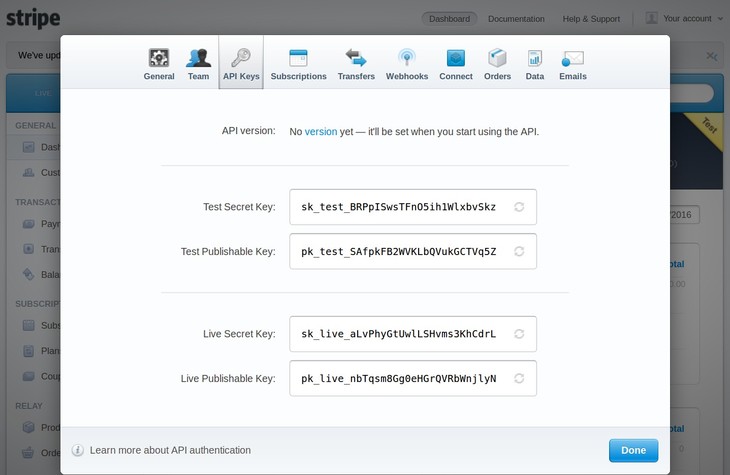
Once you’ve created a developer account, sign in to Stripe, go to Your Account / Account Settings and click on ‘API Keys.’ Or simply click on this direct link: Stripe Dashboard => API keys to get there.
You’ll see API keys similar to those shown in the screenshot below. The Test Secret Key and Test Publishable Key are what we’ll use in this article – only for the purpose of demonstrating how Stripe integrates with a Rails application. You should employ your Stripe Live keys only when you’re ready to deploy your payment gateway for production.

Create a Stripe Payment Form
You won’t be able to charge your clients without a payment form, so you’ll have to create one. The simplest way to create a payment form to accept Stripe payments is to use Stripe Checkout. Stripe automatically generates a minimally acceptable – yet practical – payment form. You only need to include this code on your payment page to get the basic form:
As we can see, this is just a form with a Stripe Checkout script. You have to include two attributes in the script to make it work. First, provide a link to checkout.js in the source attribute. Second, make sure you insert your API key, more specifically, the Test Publishable key. Copy your key in the data-key attribute.
Once you add this form to your payment page, you’ll see a standard Stripe Checkout payment button. When the client clicks on this button, an automatically generated payment form will appear. Upon submission, Stripe Checkout will validate the payment card details and will generate a token. This token will be added as a hidden element in the payment form and submitted to your server.
At this point you only need to accept the token on your backend – but we’ll do this later in the charges controller. If you want to customize the Stripe Checkout payment form, you can use some attributes such as data-name, data-image, or data-description, as we’ve included in the script tag above. These details are completely optional, however.
Keep in mind that if you want a fully custom payment form, you’ll have to create a token and a handler for submitting this Stripe token to your server. You’ll also need to add a couple of scripts:
and
Your main script must accept payment data from the payment form and run a callback function – a handler – that will add another input field to your payment form:
The handler will also submit the form to your server. If you don’t add this input field with the Stripe token, you won’t be able to accept charges on the backend.
To simplify and speed up the integration of Stripe into your Rails application, we recommend using Stripe Checkout. Then, once everything is working fine, you can design your own custom payment form.
Install Stripe in Your Rails Project
Let’s work now on the backend functionality. Open the Gemfile for your Ruby on Rails project and add the following line of code:
Next, install the Stripe gem with the following command:
Finally, create a new controller for Stripe charges via the command line:
Let’s now configure the Stripe API keys.
Configure the Stripe Keys
Log back into your Stripe account and open the API Keys tab. As we mentioned before, the test keys can only be used for your development environment.
Save your API keys in the secrets.yml file under the config folder. And don't lay open your production keys, as doing so will compromise the security of your application!
The keys we provided above are only examples, and were retrieved from our test account on Stripe. Now you need to open the stripe.rb file, which is created in the initializers folder under config. Add the following code to the file:
You can only write test keys directly into the stripe.rb file. Production keys must be saved in the environmental variables, like this – ENV['STRIPE_PUBLISHABLE_KEY'] and ENV['STRIPE_SECRET_KEY'].
The next step is to configure routes and to create the Stripe charges controller class. You need to write routes for charges in the routes.rb file that is located in the config folder. Add the following code to it:
Write the Stripe Charges Controller and Service Object
Remember when we created the charges controller class? Now you need to add the following code to it:
As we can see, the charges controller only creates a new Stripe charge with several parameters – the ID of an order, a token, and a client email. The Stripe token is the main parameter. And don’t forget to catch errors in your code.
Now let’s write code for our service object. The Stripe charges services class looks like this:
As we can see, with this service class we’re able to charge clients and check whether they’re new or they’ve already registered. Make sure that the default currency is correct.
Test the payment procedure once you’ve completed all of these steps. You can use Stripe's standard test credit card number (4242 4242 4242 4242), CVV (123), and any future date to check if your application gets back the token from Stripe.
Once you’ve completed all the steps described above, you’ve successfully integrated Stripe Checkout into your Rails application. Now you can create a custom payment form and use the live API keys, and you can let clients pay with Stripe on your website.


