-
Product Management
Software Testing
Technology Consulting
-
Multi-Vendor Marketplace
Online StoreCreate an online store with unique design and features at minimal cost using our MarketAge solutionCustom MarketplaceGet a unique, scalable, and cost-effective online marketplace with minimum time to marketTelemedicine SoftwareGet a cost-efficient, HIPAA-compliant telemedicine solution tailored to your facility's requirementsChat AppGet a customizable chat solution to connect users across multiple apps and platformsCustom Booking SystemImprove your business operations and expand to new markets with our appointment booking solutionVideo ConferencingAdjust our video conferencing solution for your business needsFor EnterpriseScale, automate, and improve business processes in your enterprise with our custom software solutionsFor StartupsTurn your startup ideas into viable, value-driven, and commercially successful software solutions -
-
- Case Studies
- Blog
How To Build an Ethereum Smart Contract for a Blockchain Marketplace
Smart contracts can literally revolutionize the way people and businesses interact. However, this technology is in its early days, so many software developers don’t have a clear understanding of how to create and execute smart contracts. No matter what technology you work with, being able to create smart contracts gives you a competitive advantage.
We’ve decided to shed light on this subject and show you how to build a smart contract on the Ethereum blockchain platform.
Ethereum as a platform for building decentralized applications
There are several blockchain platforms that allow developers to create and execute smart contracts, but we’re going to opt for Ethereum, the biggest and most mature platform created specifically for this purpose. It’s the first blockchain platform that can execute arbitrary code, so theoretically you can run any program on Ethereum.
The Ethereum blockchain is a powerful distributed global infrastructure that enables you to complete various projects with the help of smart contracts.
-
Create your own cryptocurrencies
Ethereum allows you to create a tradable token that you can use as a new currency or virtual share. These tokens use a standard coin API, meaning they’re compatible with any wallet on the Ethereum blockchain.
-
Raise funds
You can use smart contracts for fundraising on the Ethereum blockchain. You can create a smart contract that specifies a goal and a deadline so if you fail to achieve this goal, all donations will automatically be returned to donors without any commissions or disputes.
-
Build virtual organizations
You can write a smart contract that creates a blockchain-based organization; you can then add people to your organization and set voting rules. Members of your organization will be able to vote and if the required number of votes is reached, your smart contract will execute automatically.
-
Develop decentralized applications
Ethereum allows you to build fault-tolerant and secure decentralized applications (read: applications that run on the blockchain) that provide transparency and remove intermediaries.
How the Ethereum platform executes smart contracts
Before diving into building an Ethereum smart contract, you should have a clear understanding of what’s under the hood of the Ethereum blockchain platform and how exactly it executes smart contracts. So let’s go from the bottom up and start from the execution environment.
-
Ethereum Virtual Machine (EVM)
To execute arbitrary code, Ethereum developed the EVM, a special virtual machine that’s an interpreter for the assembly language. The EVM’s functionality is more limited than that of similar virtual machines; for example, it can’t make delayed calls or requests on the internet or generate random numbers, so it’s simply a state machine. Writing programs in assembly language makes no sense, so Ethereum needed a programming language for the EVM.
-
Solidity
Solidity is the smart contract language on Ethereum. It’s a general-purpose programming language developed on top of the EVM. Just like other object-oriented languages, Solidity uses a class (contract) and methods that define it. Theoretically, Solidity allows you to perform arbitrary computations, but its main purpose is to send and receive digital tokens as well as store states. In terms of syntax, Solidity was influenced by JavaScript, C++, and Python so experienced programmers can understand its syntax easily.
To write an Ethereum smart contract properly, you should carefully read the documentation to learn more about Solidity and how to program with it.
-
Gas
On the Ethereum blockchain, each smart contract is processed by one miner and the result of this operation is a block that’s added to the Ethereum blockchain. Miners must be rewarded for their efforts, so executing any smart contract on the EVM requires a fixed payment called gas. You should specify the amount of gas you want to spend for executing any smart contract you create. The more complicated the smart contract, the more gas it requires.
Getting started with an Ethereum smart contract
Time to get down to work and build a smart contract!
We’ve decided to develop a basic Ethereum smart contract for a blockchain-based marketplace, but you’re welcome to come up with your own ideas for smart contracts.

To implement an Ethereum smart contract for a blockchain marketplace, you need the following toolkit:
- Node.js − A JavaScript runtime environment for server-side programming. You need Node.js for testing the functionality of your Ethereum smart contract and ensuring its proper and secure operation. Along with Node.js, you should install a package manager such as Yarn.
- Truffle − A popular Ethereum development framework that allows you to write and test smart contracts. Truffle is written in JavaScript and contains a compiler for the Solidity programming language.Truffle Сontract is a JavaScript library that facilitates importing of compiled smart contracts.
- Ganache CLI − An Ethereum remote procedure call (RPC) client within the Truffle framework; formerly known as TestRPC.
- Web3.js − An Ethereum JavaScript API that communicates with the Ethereum network through RPC calls.
- Parity − A fast and secure Ethereum client for managing accounts, tokens, and so on.
- Visual Studio Code − A functional code editor; in fact, you’re welcome to use any other editor.
Step-by-step guide to building a smart contract on Ethereum
Writing a smart contract on Ethereum may seem simple, but you should make sure your contract functions properly and has no vulnerabilities, so we recommend covering all logic with automated tests.
We’re going to split this smart contract tutorial into four steps. During the first three steps we’re going to write and test the code, while in the last step we’re going to deploy the contract on the Ethereum blockchain.

Let’s get started.
Step #1: Introducing two parties to an Ethereum smart contract
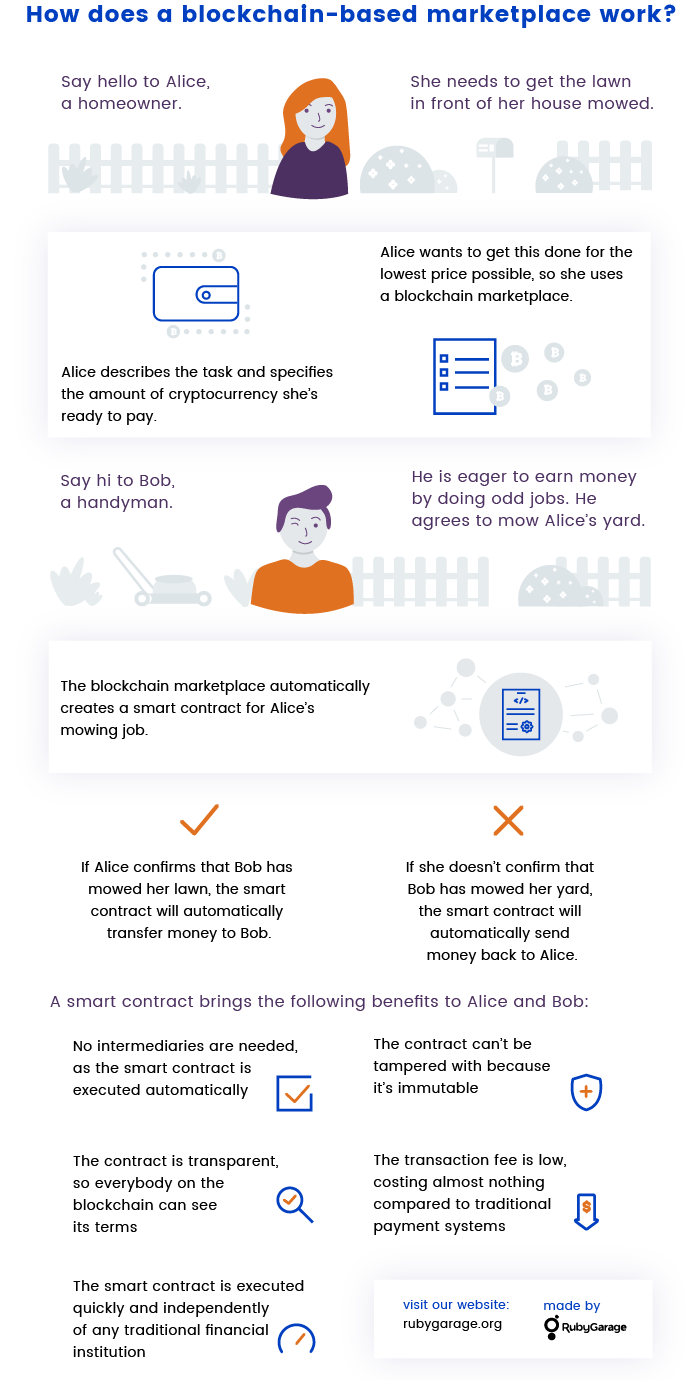
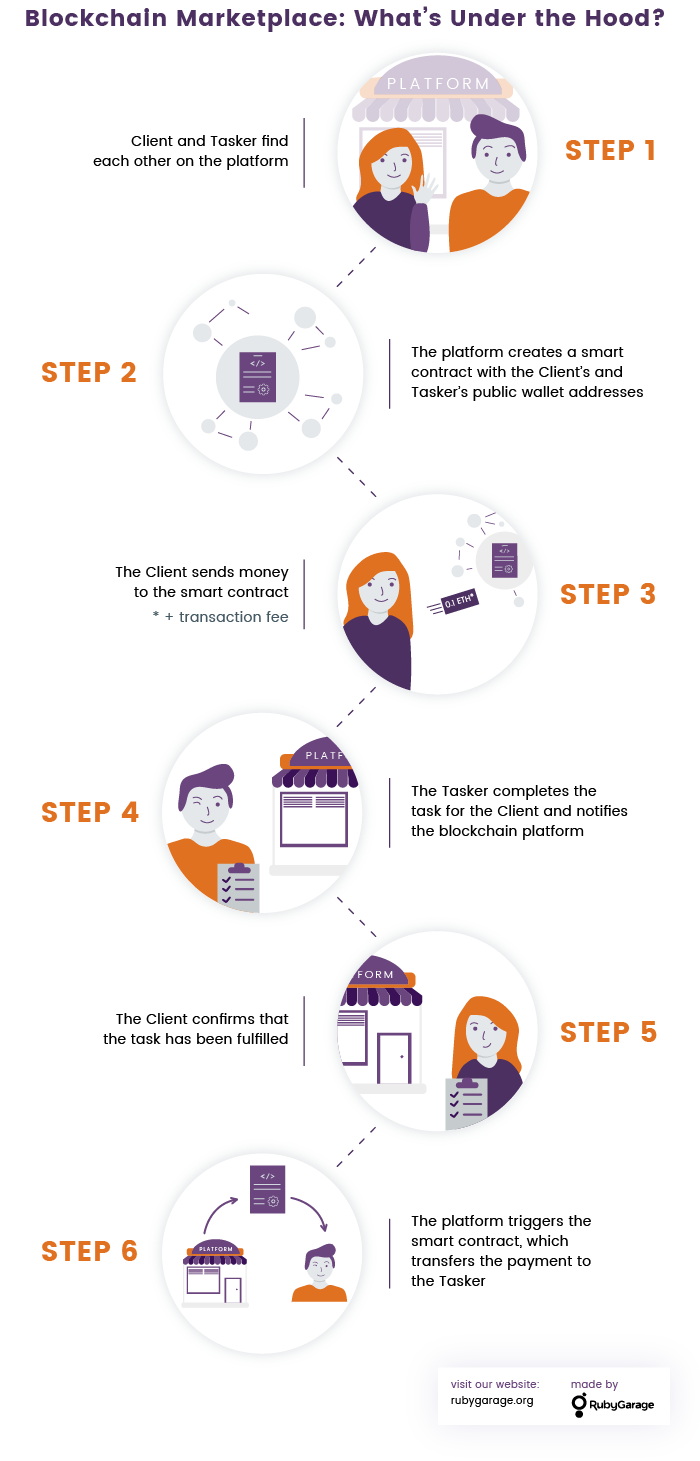
Any smart contract is concluded by two sides. Since we’re building a smart contract for a marketplace, we’re going to have two roles:
- The client, who needs to get some home service done.
- The tasker, who completes a task and gets paid for it.
A client pays a tasker for fulfilling a task, so you should add a payment amount to the smart contract as well; we called it payAmount.
Before coding these two roles and the payment amount into the smart contract, let’s write an automated unit test with JavaScript:
Now it’s time to implement exactly the same logic to write the actual smart contract with Solidity:
To find out whether your Solidity code is correct, run the test in Truffle using this code (it’s the same for all three steps):
The smart contract must pass the tests, otherwise there’s a mistake in your code.
Step #2: Enabling a client to transfer money to a smart contract
A smart contract acts like a separate account that can either send money to a tasker or send it back to a client. But first, a client must be able to send money to the smart contract. At this step, you need to add this functionality to the smart contract.
As usual, start from updating the test file. You should specify that nobody but a client can transfer money to a smart contract and that it’s impossible for anyone to increase the payAmount:
Now update the smart contract by adding the code that allows a client to transfer money to it:
Don’t forget to run tests against the smart contract to check if everything is okay.
Step #3: Allowing a smart contract to transfer money to a tasker
Finally, your smart contract must be able to automatically send money to a tasker as soon as a client confirms that the task has been completed. To implement this functionality, we need to introduce a new role in the smart contract – a deployer, which is a web application on your blockchain marketplace – and specify that only a deployer can initiate a transfer of money to a tasker. Also, make sure that the payAmount gets nullified once it has been sent to a tasker.
Let’s first implement all this logic in tests; you have to make it impossible for a deployer or any other third party to trigger a payAmount transfer from the smart contract to a tasker. At this step, you should get a long and detailed test file looking something like this:
Now you should add this logic to the smart contract itself: introduce a deployer and allow it to transfer money to a tasker. The full smart contract we built looks like this:
Finally, to check that the smart contract contains no errors, test it in Truffle.
Step #4: Deploying your smart contract
The smart contract in Solidity is ready so there’s one final step − compile and then deploy it. Since this is a tutorial, deploying the contract on the Ethereum network itself makes no sense, so we’re going to do it in Ropsten, a popular test network for Ethereum.
This is actually the most difficult step in our tutorial, so we’re going to split it into several sub-steps:
Create Ethereum wallets
There are three roles in our smart contracts, so to test if everything works, we need to create three wallets on Ethereum: for the client, for the tasker, and for the depolyer respectively. Needless to say, the deployer’s wallet is going to be the same for all smart contracts in our decentralized marketplace, while the client’s and deployer’s wallets will be different for each smart contract.
Get Ether on the Ropsten testnet
Newly created Ethereum wallets have a balance of zero ether, so to carry out a smart contract we need to get some ether. This is quite simple, as we’re deploying the smart contract on the Ropsten testnet.
There are several ways to get free test ether. Let’s use the Metamask plugin (we used the version for Google Chrome). Metamask is an Ethereum extension that allows you to work with decentralized applications right in your browser. Import a Metamask account and add the three wallets to it. Then, visit https://faucet.metamask.io/ and request free ether; however, be prudent as you can only get a limited number of free ether per account.
The logic of our smart contract works like this: the money is transferred from a client to a smart contract, then automatically sent to a tasker. Therefore, we need our eth in the client’s wallet.
Compile the smart contract with Truffle
We’ve already built a smart contract written in Solidity, but it should be turned into a .json file for deployment. Use Truffle to compile your smart contract; it will create a .json file that you can call whatever you want (we called it OddjobPayContract.json).
Run a deployment script
To deploy your smart contract on the Ropsten testnet, we produced the following script in JavaScript:
Execute your smart contract
Once your smart contract is deployed, you can execute it. To do this, you need to specify the wallets for the client, tasker, and deployer and the reward for the tasker.
Keep in mind that deploying a smart contract costs a specific amount of gas, so make sure to specify the amount of gas you’re including in your smart contract. If a smart contract requires less gas than you provide, the rest will be returned to you. But if the execution of a contract requires more gas, it will simply fail with the “out of gas” error. You can use the eth_estimateGas method to estimate the amount of gas it will require to deploy your smart contract. Unfortunately, this only provides an estimate and the actual amount of gas can be higher, so it’s always better to include more gas. Keep in mind that the lower the gas limit you provide, the lower the priority your smart contract will have on the Ethereum network (unless you increase the gas price), and it’s possible that web3 will return an error telling you that your transaction hasn’t been mined within 50 blocks. In this case you should either include more gas or simply use the gas limit from the latest successfully mined block.
Finally, execute the smart contract. In some time, you can check the balance in all three wallets to find out whether everything worked.
Final thoughts
Smart contracts have huge potential. Not only do they streamline transactions, they can revolutionize whole industries such as real estate, banking, ecommerce, and healthcare. We’ve shown how you can build a small and quite simple smart contract, but you can try creating more sophisticated contracts. If you’re facing challenges developing a smart contract, you can check out our full code in this repository on GitHub.


