-
Product Management
Software Testing
Technology Consulting
-
Multi-Vendor Marketplace
Online StoreCreate an online store with unique design and features at minimal cost using our MarketAge solutionCustom MarketplaceGet a unique, scalable, and cost-effective online marketplace with minimum time to marketTelemedicine SoftwareGet a cost-efficient, HIPAA-compliant telemedicine solution tailored to your facility's requirementsChat AppGet a customizable chat solution to connect users across multiple apps and platformsCustom Booking SystemImprove your business operations and expand to new markets with our appointment booking solutionVideo ConferencingAdjust our video conferencing solution for your business needsFor EnterpriseScale, automate, and improve business processes in your enterprise with our custom software solutionsFor StartupsTurn your startup ideas into viable, value-driven, and commercially successful software solutions -
-
- Case Studies
- Blog
Planning QA Activities: All You Need to Know Before Starting the Testing Process
When looking for a QA team to test your new product, you want your cooperation to be effective and transparent. You might spend time deciding which team to hire, but no matter what company you choose, your cooperation should start with creating a test plan. What is a test plan? Why do you need to have one? Why is it important for you to participate in QA test planning? You’ll find all the answers in our article.
What is a test plan?
A test plan is a document jointly created by a client and a QA team that includes all information about the testing process. Cooperation between the client and QA team starts with this document, which increases the chances of successful cooperation.
Why do you need a test plan?
First of all, a test plan gives you a clear understanding of how testing will be conducted. In the course of planning, you’ll answer a number of questions concerning your testing needs, priorities, and expected results to set clear expectations and determine the cost and timeline for your project. Here are some other reasons why you need to invest time in test planning:
- To set clear goals, expectations, and requirements for the testing process. By participating in test planning with your QA team, you’ll understand what to expect from your cooperation.
- To get better control over the testing process. During test planning, you’ll define what kinds of reports you want to get and how often. For example, it might be convenient for you to get a weekly report via email. Discuss this with your QA team to keep up with the testing process.
- To clarify the time, effort, and expenses needed to test your product. Before actually testing your product, your QA team will estimate the scope of work and then divide it into smaller milestones. This approach allows a QA team to estimate the time needed for testing, set realistic deadlines, and calculate the cost.
Now that you understand why test planning is an inevitable part of the quality assurance process, let’s proceed to a detailed guide to writing a test plan.
Step-by-step guide to creating a test plan
Once you’ve made up your mind about the QA team to test your product, it’s time to create a test plan. Here’s an example of a test plan created by the RubyGarage QA team for one of our projects.
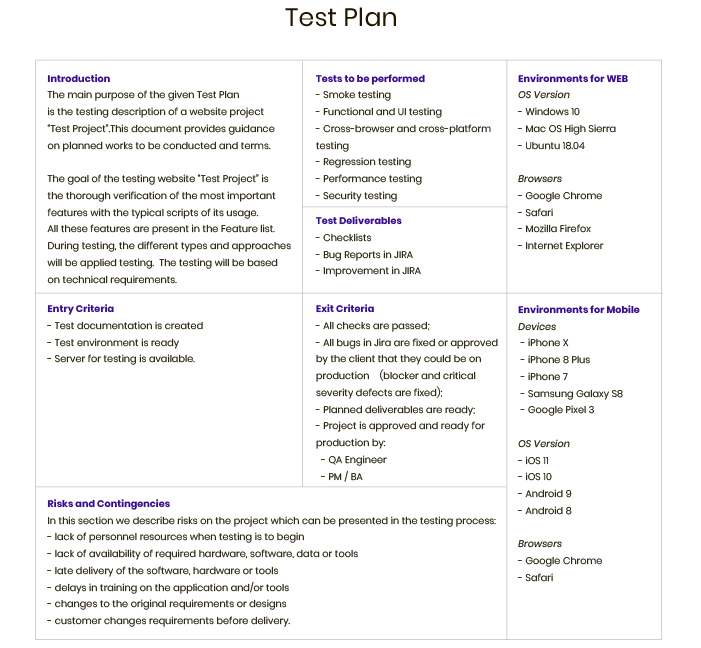
Step 1 — Analyze the product
The first pillar of successful testing is thorough analysis of your product, its features, and its functionalities. After that, the QA team needs to find out your business objectives to make sure the final product can meet them. To get the end user’s point of view, the testing team also needs to understand who the target audience is.
Step 2 — Design a test strategy
The test strategy is about the way a QA team will test a product. Your team may use different testing techniques depending on your product’s use cases and your business requirements.
Defining the scope of testing
When defining the scope of testing, you and your QA team should create a list of all product components to be tested. This is a list of all the hardware, software, and middleware you want your product to be compatible with. The items on this list are said to be “in scope.” All hardware, software, and middleware that’s irrelevant for your project and won’t be tested for compatibility with your product are “out of scope.”
Identifying types of testing
At this stage, you and your QA team should discuss what type of testing to use during the quality assurance process. You can choose different types of testing depending on the product itself and your testing goals.
Here are some types of testing that a QA team can use to check different parts of your software product:
- API testing helps you check the performance, functionality, and security of application programming interfaces.
- Integration testing checks individual software modules combined in a group. This type of testing is aimed at identifying faults that might appear when modules interact.
- System testing helps you check a product as a whole and make sure it works as it should.
- Install/uninstall testing ensures the flawless operation of product installation and removal processes.
Step 3 — Define test objectives
At this stage, your QA team will ask you to list all features you want to test. You should provide your QA team with a list of features prioritized according to their importance. As a result, the QA team can start testing the most important features to reduce the time to market.
Secondary features should be tested after the primary ones. You can also list features that don’t need to be tested.
Step 4 — Determine test criteria
During this stage, you and your QA team should decide on the criteria that determine a successful outcome of testing. The RubyGarage QA team defines the following testing criteria:
Suspension criteria
Suspension criteria are conditions under which testing should be temporarily stopped. By defining suspension criteria, a QA team prevents wasting time and effort when testing is impossible or meaningless.
Example: If 40 percent of test cases fail, the QA team should suspend testing until the development team fixes all failed cases.
Exit criteria
Exit criteria describe conditions under which tests are considered successful and tested piece of functionality can be forwarded to another stage.
Example: If more than 95 percent of critical test cases operate properly, testing has been successful.
Step 5 — Plan resources
In this step, you should enumerate all the resources needed for performing tests including time, people, money, and equipment.
The number of specialists needed for a project will become clear after the estimation stage when the scope of work has been completely defined. When working with a dedicated team, you can increase the number of QA engineers who work on your project if you need to launch fast.
As for the equipment and system resources, you and your QA team should agree on such things as devices, networks, servers, etc. to be used during quality assurance checks.
Step 6 — Plan the test environment
Deciding on the hardware and software environment is a must while planning QA activities. The testing environment is the software and hardware on which the testing team will execute test cases. It’s important to define this environment to make sure that your product can meet the needs of your end-users.
Step 7 — Combine schedules and estimates
During the estimation stage, the QA team divides the whole testing process into subtasks to understand how much time it will take to test each separate feature.
Once the estimation is done, the QA team sets a timeline, milestones, and schedule for the project. You can increase the number of team members to meet your deadlines depending on your needs.
Step 8 — Clarify test deliverables
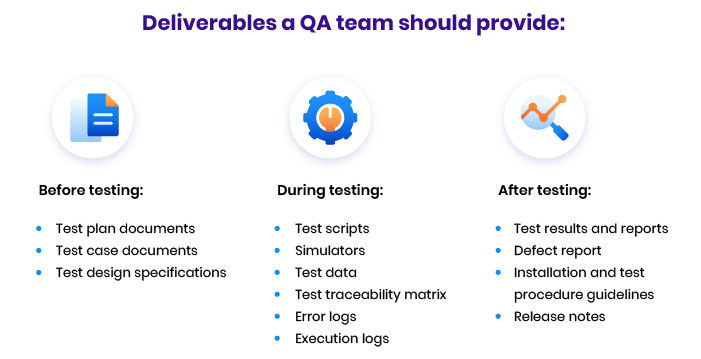
During this step, you and your QA team should agree on deliverables to be provided during your cooperation. A QA team creates deliverables before, during, and after testing.
Test components to be created
When creating a test plan, a number of documents and components are generated to clarify details of the testing process and your cooperation with your QA team.
Test plan ID
A test plan ID includes data about the project version and test plan type. Creating a test plan ID is convenient for a QA team since it helps keep all projects and documentation in order.
Introduction
In this test component, the QA team gives a brief description of the project and specifies test objectives along with any constraints that might appear.
References
In this test component, the QA team lists all documents connected with the project, such as a System Requirement Specification (SRS), use case documents, test strategy, project plan, project guidelines, etc.
Test items
In this test component, the QA team lists all software/product versions that must be included in testing.
Example: Testing should be done on both the front end and back end of the application in Windows and Linux environments.
List of features to be tested
Every feature that’s going to be tested should be listed here. Features to be tested should be referenced with the design or requirement specifications.
Example: The features to be tested are the login page, dashboard, and reports.
List of features not to be tested
In addition to listing what features won’t be tested, it’s important to explain why there’s no need to test them.
Example: Payment using PayPal is about to be removed from the application, so there’s no need to test this feature.
Approach
In this section, the client and QA team determine the overall approach to testing. The chosen approach has to include information about types of testing, testing methods (manual or automated; white, black, or grey box testing) to be applied during quality assurance checks.
Pass and fail criteria
Pass criteria are the criteria that indicate successful testing results. Depending on the type of testing, pass and fail criteria can vary.
Example: All major application functionality should work as intended, more than 95 percent of test cases should pass, and there should not be any critical bugs.
If testing results don’t meet the pass criteria, the test is considered as failed.
Suspension and resumption requirements
Suspension requirements ensure more effective product development and bug fixing. It’s important to put off further testing in case of severe shortcomings. For this, you and your QA team need to establish criteria for suspending and resuming testing.
Test deliverables
In this section, you and your QA team list all documents and reports the QA team should provide you with. This list also includes information about stages when each deliverable has to be presented. The list of deliverables can include such documents as a test plan, test cases, and bug reports.
Testing tasks
In this section, the QA team specifies the testing tasks it needs to complete in a particular project.
Example: The test environment should be ready before the test execution phase. The QA team should prepare a test summary report.
Environmental needs
In this section, you and your QA team should specify hardware and software environments needed for product testing. Here’s how environmental needs can look like:
| Browser | Version |
|---|---|
| Chrome | 66 |
| Firefox | 60 |
| Safari | 11 |
| IE | 11 |
Estimate
Every project has to be estimated in terms of the time and effort needed for testing. An estimate can be presented in the form of a document containing a feature breakdown list. This list should include all features that need to be tested and the time planned for testing. While estimating, a QA team should include both optimistic and pessimistic estimates to account for unpredictable complications that may occur during the testing process.
Schedule
The schedule divides the whole testing workflow into milestones. These milestones are presented in chronological order with deadlines so it’s easier to control the testing process.
Staffing and training needs
Here, the QA team needs to indicate if team members need any additional skills or knowledge to carry out the testing activities.
Responsibilities
In this section, you can find duties and responsibilities distributed inside the team. Duties can be represented in a RACI matrix where RACI stands for responsible, accountable, consulted, and informed. It’s important to include this information in a test plan since a RACI matrix makes roles and responsibilities clear, allows you to estimate the workload of every team member and evenly distribute tasks, and simplifies communication between you and your client and within your testing team.
Risks
In this section, the QA team states the probability that risks will occur on the basis of previously identified risk factors, along with a plan for mitigating such risks.
Assumptions and dependencies
Assumptions are ideas about the flow of the testing process that are expressed before testing begins. Assumptions don’t have any factual evidence and are based on a QA team’s experience. However, they can influence the course of testing.
Dependencies are chains of interdependent tasks. For example, without one task being completed, the QA team may not be able to move to another testing stage. Describing this sequence ensures a flawless testing process.
Approvals
In this section, the client and QA team determine who is responsible for approving the test plan.
Wrapping up
With a detailed test plan, your cooperation with a QA team has every chance of being effective. Considering all test aspects together with a quality assurance team, you’re bound to enjoy your cooperation and, what’s more important, the results.
FAQ
-
A test plan is a must to
- set clear goals, expectations, and requirements for the testing process
- get better control over the testing process
- clarify the time, effort, and expenses needed to test your product.
-
If you want to create a test plan, follow these steps:
- Analyze your product
- Design a test strategy
- Define test objectives
- Determine test criteria
- Plan the resources needed for testing
- Plan the test environment
- Combine your schedule and estimates
- Specify test deliverables
If you need professional assistance with your quality assurance check, contact us to ensure your product’s stability.
-
These are the deliverables a QA team should create before, during, and after testing:
Before testing:
- Test plan documents
- Test case documents
- Test design specifications
During testing:
- Test scripts
- Simulators
- Test data
- Test traceability matrix
- Error logs
- Execution logs
After testing:
- Test results and reports
- Defect report
- Installation and test procedure guidelines
- Release notes


