-
Product Management
Software Testing
Technology Consulting
-
Multi-Vendor Marketplace
Online StoreCreate an online store with unique design and features at minimal cost using our MarketAge solutionCustom MarketplaceGet a unique, scalable, and cost-effective online marketplace with minimum time to marketTelemedicine SoftwareGet a cost-efficient, HIPAA-compliant telemedicine solution tailored to your facility's requirementsChat AppGet a customizable chat solution to connect users across multiple apps and platformsCustom Booking SystemImprove your business operations and expand to new markets with our appointment booking solutionVideo ConferencingAdjust our video conferencing solution for your business needsFor EnterpriseScale, automate, and improve business processes in your enterprise with our custom software solutionsFor StartupsTurn your startup ideas into viable, value-driven, and commercially successful software solutions -
-
- Case Studies
- Blog
How to Create a Morphing Animation: A Step-by-Step Guide
There are various ways to make a mobile app exciting and dynamic and one way is implementing animations.
Let’s imagine we want to animate an icon that’s responsible for some action or demonstrates a certain state, like inactive mode. We can Google how to do it or ask a UX designer. But what if these two methods don’t help us? There’s a way out – we can do it all ourselves!
In this article, we talk about animated drawable vectors and how to easily create them in your app. After reading this tutorial, you’ll be able to create an animation to morph from one icon to another. To be precise, we’ll show you how to morph from the back arrow icon to the close icon. For this, we’ll need standard non-animated icons. We can get them either from the The Vector Asset library built in to Android Studio or download XML files from sites such as Material Design Icons or Material Design. Let’s start.
The concept of vector graphics
For a deeper understanding of this topic, we’ll talk a little about vector graphics, namely, what they consist of. Vector graphics frequently consist of one or more paths. A path is an element that describes a set of lines, curves, and arcs, or simply put, path contains a set of commands that are responsible for drawing lines, circles, etc. These commands, in turn, contain parameters that represent coordinates or degrees on a circle.
How to create a morphing animation
To apply a morphing animation to two icons, you’ll need to verify they’re compatible with each other. To be more precise, their icon paths must contain the same commands (and the same number of commands), and they must maintain the calling order of these commands.

Unfortunately, we can’t use these icons to create a morphing animation, since they’re not compatible with each other. If you decide to use them in your animation, you’ll get an exception and your application will crash. Of course, you can always use online tools that optimize everything for you. However, in this case, you may not achieve the desired result or may spend more time editing to get optimized icons. Although we can’t use these icons, they can still help us create our own optimized icons.
First, let’s figure out our animation and how our icons will be transformed. To do this, we’ll divide our icons into components.

After breaking each icon into two components, it’s easier to imagine how each component will behave. Below, we provide an example of how to convert each element to create a morphing animation from the first icon to the second.
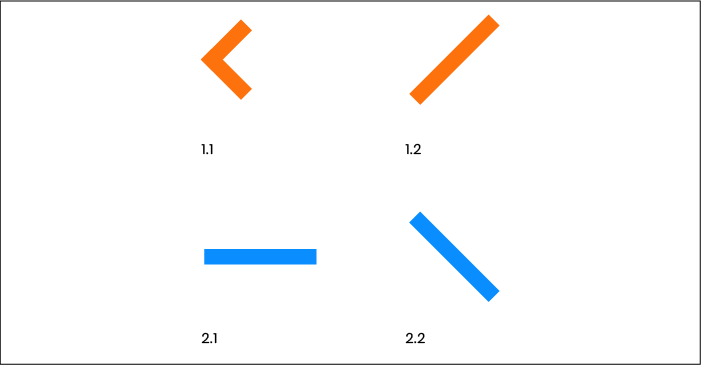
Now we need to decide what minimum number of commands we can use. To do this, we need to place points that will correspond to commands. In our case, they’ll be located at all edges of individual elements from the previous image. Different colors show different components.

As we can see, we need ten points for the back arrow icon and only six for the close icon. To keep the number of points equal, we need to add two more to the close icon, taking into account the planned animation.

Furthermore, to create a morphing animation from the back arrow icon to the close icon, we should define the start and end positions of each point. The start position of the point is its location in the first icon, and the end position is its location in the second. We’ll number each point in accordance with its order in the animation.

Once we’ve decided on the number of points and numbered them, it’s time to draw our own vector graphic. However, it will be difficult to draw icons from scratch, observe the proportions, and position the elements. This is where the original icons come in handy. When starting with non-optimized icons, we can simply set the transparency and change the color for contrast. After this, we can draw on top of them.
In our case, it will be enough to use the “M” and “L” SVG commands that are available for a path to create a vector graphic. Nevertheless, you can always use other commands to create more complex graphics. You can find a list of all keys and drawing rules in the W3C Editor’s Draft. .
To start, with the “M”(moveto) command, we move to the starting point, and then with the “L” (lineto) command, we move from point to point, simultaneously selecting coordinates based on a translucent image.

After we’ve got our own vector icons, we can start creating animations. For convenience, let’s create a vector.xml file in our application’s resources. In this vector.xml file, we’ll create two strings where the path of the vector graphics will be stored.
Now we need to create a drawable named animation_arrow_back_to_close.xml, in which we describe the rules of our animation.
Let’s analyze the above code in more detail:
- android:drawable="@drawable/ic_arrow_back_24dp" – This is the initial image in our animation.
- <target android:name="@string/vector_animation_path_name"> – We define the animated area and give it a unique name.
- android:duration="@integer/animation_duration"– We set the length of the animation.
- android:interpolator="@android:interpolator/accelerate_decelerate" – The interpolator determines the timing of the animation.
- android:propertyName="pathData" – Creates the property name that is animated.
- android:valueType="pathType" – Sets the type of a configurable property.
- android:valueFrom="@string/arrow_back_path" and android:valueTo="@string/close_path" – Sets the start and final path of our animation.
That’s all. Our animation is ready, and now we can call it:

It looks really good, but there isn’t enough rotation to smooth out the transform effect.
But if we apply a rotation animation to <path />, we get an exception: java.lang.IllegalArgumentException: Property: rotation is not supported for FullPath. Never mind. Just wrap the <path> in a <group> and set a unique name for the group. Then indicate the group name for the target of the rotation animation.

Unfortunately, Android vector animations don’t support reverse playback. To be able to play a reverse animation, from icon B to icon A, we need to create another animation file.
For convenience, we can wrap these two animations in one class. You can see an example of our animated icon as a back button in an ActionBar.

Wrapping up
Using animated vector graphics in your app allows you not only to attract users’ attention but to enhance interactions. We hope this tutorial has helped you improve your skills, and we hope we’ll see a lot of great morphing animations from you soon.
Check out the source code for this tutorial, and don’t hesitate to start a conversation below if you have any questions. Also, don’t forget to subscribe to our blog for more useful tutorials!


