-
Product Management
Software Testing
Technology Consulting
-
Multi-Vendor Marketplace
Online StoreCreate an online store with unique design and features at minimal cost using our MarketAge solutionCustom MarketplaceGet a unique, scalable, and cost-effective online marketplace with minimum time to marketTelemedicine SoftwareGet a cost-efficient, HIPAA-compliant telemedicine solution tailored to your facility's requirementsChat AppGet a customizable chat solution to connect users across multiple apps and platformsCustom Booking SystemImprove your business operations and expand to new markets with our appointment booking solutionVideo ConferencingAdjust our video conferencing solution for your business needsFor EnterpriseScale, automate, and improve business processes in your enterprise with our custom software solutionsFor StartupsTurn your startup ideas into viable, value-driven, and commercially successful software solutions -
-
- Case Studies
- Blog
The Ultimate Guide to Configuring a Rails App on Amazon EC2 with Chef: Part 1
If you’ve configured a server with an approach that involves manual text editing, transitions between GUI screens, and periodic use of the command-line interface, then you may have encountered difficulties with the following:
- Reproducible builds (snowflake servers) – Creating and configuring identical servers (e.g. for staging and production environments) takes a lot of time and requires repeating the same actions. This leads a development team to focus on resolving old problems rather than building new innovations.
- Revision history – You have to remember all the changes you’ve made or have a separate document in which the state of the configuration files is logged.
- Reverting – Returning a server to a certain state, for example after unsuccessful changes, is time-consuming. In critical cases, it’s more appropriate to recreate the server from scratch, entailing the first problem.
- Teamwork – Big development teams find it difficult to manage server infrastructure because usually there’s no organized approach to server configuration. Anyone can log on to the application server and make changes through the console, and usually it’s difficult to track what actions were committed. This generates a large number of conflicts and errors.
- Testing – The use of infrastructure testing tools in such format of work is either limited or impossible.
When increasing the number of supported servers, all these problems grow proportionally. This complicates and slows down development, reduces the quality of the application, and increases the likelihood of errors. There’s no place for such problems in the era of cloud infrastructure. In this article, we help you look at server infrastructure from the other side, namely from the software side.
This guide is composed of three parts to help you look at server infrastructure from the other side, namely from the software side.
In the first part of our tutorial, we discuss the advantages of the Infrastructure as Code approach and introduce the Chef automation platform that realizes this approach. We also start to describe the basic configuration to set up Rails app on Amazon EC2.
Solution: Infrastructure as Code
Infrastructure as сode (IaC), also called programmable infrastructure, is a type of IT infrastructure that you can automatically manage and provision by writing code (which can be done using a high-level language or any descriptive language) rather than using a manual process.
With IaC, you don’t just write scripts. IaC involves using tested and proven software development practices such as version control, testing, small deployments, design patterns, and so on.
Prerequisites
Let’s consider the Infrastructure as Code approach by configuring the infrastructure for a Spree application. To make this application operate correctly on a Virtual Private Server (VPS), we need the following software:
- Ubuntu 16.04 – operating system
- Ruby Version Manager (RVM) with Ruby 2.4.2 as default
- PostgreSQL 9.6 – relational database
- Nginx 1.11.13 – web server and reverse proxy server
- Redis 4.0.2 – in-memory key-value store
- ImageMagick – image processing tool
- Monit – utility for managing and monitoring Unix systems
Solution: Chef
In this tutorial, we’ll deploy a Spree app using Chef. But before doing that, we need to learn the basics of this tool.
Introduction to Chef
Chef is a powerful automation platform that you can use to manage servers by turning your infrastructure into code. Using Chef, you can write instructions for installing and configuring various packages and package managers, regardless of the operating system ‒ in the cloud, on-site, or hybrid. For example, you can set up a configuration for PostgreSQL. The main feature of Chef is that it provides a Ruby DSL (domain-specific language) to describe these instructions.
As Chef often runs in a centralized way, the central Chef server knows the configurations that must be applied to a large number of other servers. So if you update a configuration, the changes are applied to all these servers automatically. Thus, you can manage infrastructure with a large number of servers more conveniently.
Chef can also work in a solo configuration (chef-solo). In this case, we use our local environment to determine the server configuration and then manually apply these configurations to other servers when needed. This is ideal for small projects, all elements of which work on the same server. Therefore, to help you better understand how to work with Chef, we’ve based all examples in this article on chef-solo. We’ll discuss how to use Chef for managing infrastructure with a large number of servers in a separate article.
Before we start analyzing how to use Chef to configure a server, you need to get to know its ideology. Chef draws analogies from the kitchen. At first it can be confusing, but in reality everything is quite simple.
The configuration for the installation of one component or add-on for a component on the server (e.g. RVM, PostgreSQL, Redis, or Monit) is called a recipe. Recipes can be combined into cookbooks. One cookbook must include at least one recipe. So if you have two recipes – one which puts RVM on the server and another which installs rubies via RVM – you can merge these two recipes into a Ruby cookbook and later use this cookbook for the complex installation of Ruby in general.
In the same manner, just as Ruby lets us separate certain ready-made solutions into standalone gems for reuse, Chef allows you to realize the same approach that is to separate solutions into cookbooks. To do this, we use the Berksfile, which performs for cookbooks a role similar to that which the Gemfile performs for gems. In the Berksfile, you need to define the cookbooks your configuration hinges on. And just as the bundle install command sets the necessary gems for you, so the Berkshelf sets the Chef cookbooks (including specific versions) on which the configuration of your server depends.
Suppose you have several cookbooks, for example PostgreSQL and Monit, and you want to merge them into one run list and you want PostgreSQL to be installed on the server first and all settings for monitoring its processes to be installed afterward. You can use a role to solve this task. A role allows you to merge cookbooks belonging to a single job function and to set a strict order for how recipes are fulfilled. The role you’ve created will help you apply cookbooks to servers that fulfill a special purpose in your infrastructure. Thus, you can combine a cookbook for installing PostgreSQL with the recipe for configuring PostgreSQL monitoring into a single Database role.
Typically, when we describe the configuration of each host separately, we apply a specific set of cookbooks, roles, and other parameters. To do this, we use a node. A node is any machine ‒ server, cloud, virtual machine, network device, or container ‒ that you can manage with Chef.
If you follow the Infrastructure as Code approach, then you need to ensure that recipes are reusable. For instance, if you want to install Ruby version 2.4.1 on one node and version 2.5.0 on another, you don’t want to write two separate recipes for this task. Instead you can use attributes. Attributes are parameters in the form of key-value pairs. Using attributes allows you to configure the behavior of a recipe. The cases where attributes can be used are typical. We’ve already mentioned installing different versions of the same package, such as Ruby.
There’s a special place allocated ‒ environments ‒ for attributes that require a specific node environment, for example a name as a server domain for production or dev nodes (app.com, dev.app.com, etc.). Similarly, attributes can be defined at the level of cookbooks, roles, and nodes.
Imagine that several users have access to your infrastructure and each has their own specific set of rights. Each user has their own unique id/name and can access the infrastructure only with their unique password or SSH key. Data_bags can help with this task. A data bag is a global variable that contains user credentials and permissions in JSON format.
Data bags are also suitable for storing global variables that contain, for example, credentials or secret keys from external services. Because of safety considerations, all this information should be stored exclusively in encrypted form. To do this, you need to use encrypt_data_bag.
Once the configuration is ready, you need to apply it to your server. You can do so with the help of knife. Knife is a command-line interface tool that provides an interface for interactions between the local Chef repository (hosted on your machine) and a remote server.
Traditionally, this remote server would be the main Chef server, but an additional tool ‒ knife solo ‒ allows you to use Chef in solo mode and directly interact with the server that you want to configure. You can find more information about knife solo in its repository.
So far we’ve examined the following things:
- Recipes
- Cookbooks
- Roles
- Nodes
- Attributes
- Environments
- Data bags
- Berksfile
- Knife solo
If you want more detailed information about Chef, have a look at its documentation. Now it’s time to move on to the practical part of our article, namely writing configurations for the server on which our Spree application will be hosted.
Set up a VPS (EC2)
First of all, you need a VPS, the server on which you will deploy your application. We’ll use AWS EC2 (Amazon Elastic Compute Cloud) for this task. EC2 is a web service that allows you to access computing resources and configure them with minimal effort. The service is part of the the Amazon Web Services (AWS) infrastructure.
Installing an EC2 instance involves several steps:
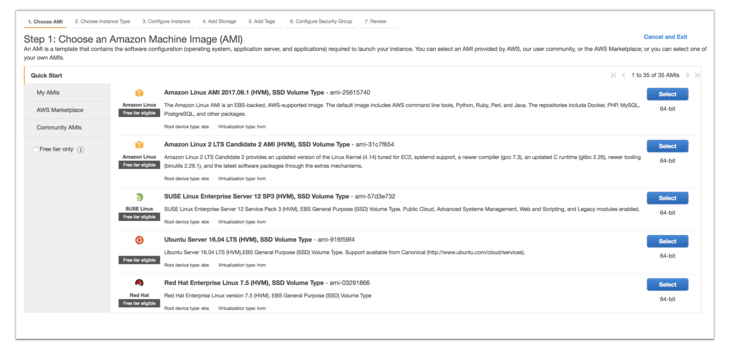
1. Choose an Amazon Machine Image
For our Spree application, choose Ubuntu 16.0.
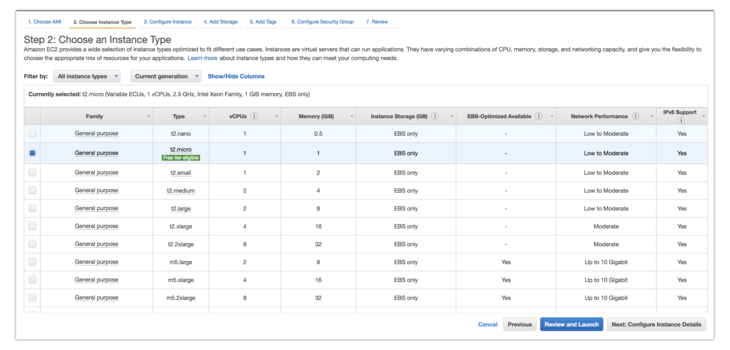
2. Choose an instance type
Decide what resources your remote server will have.
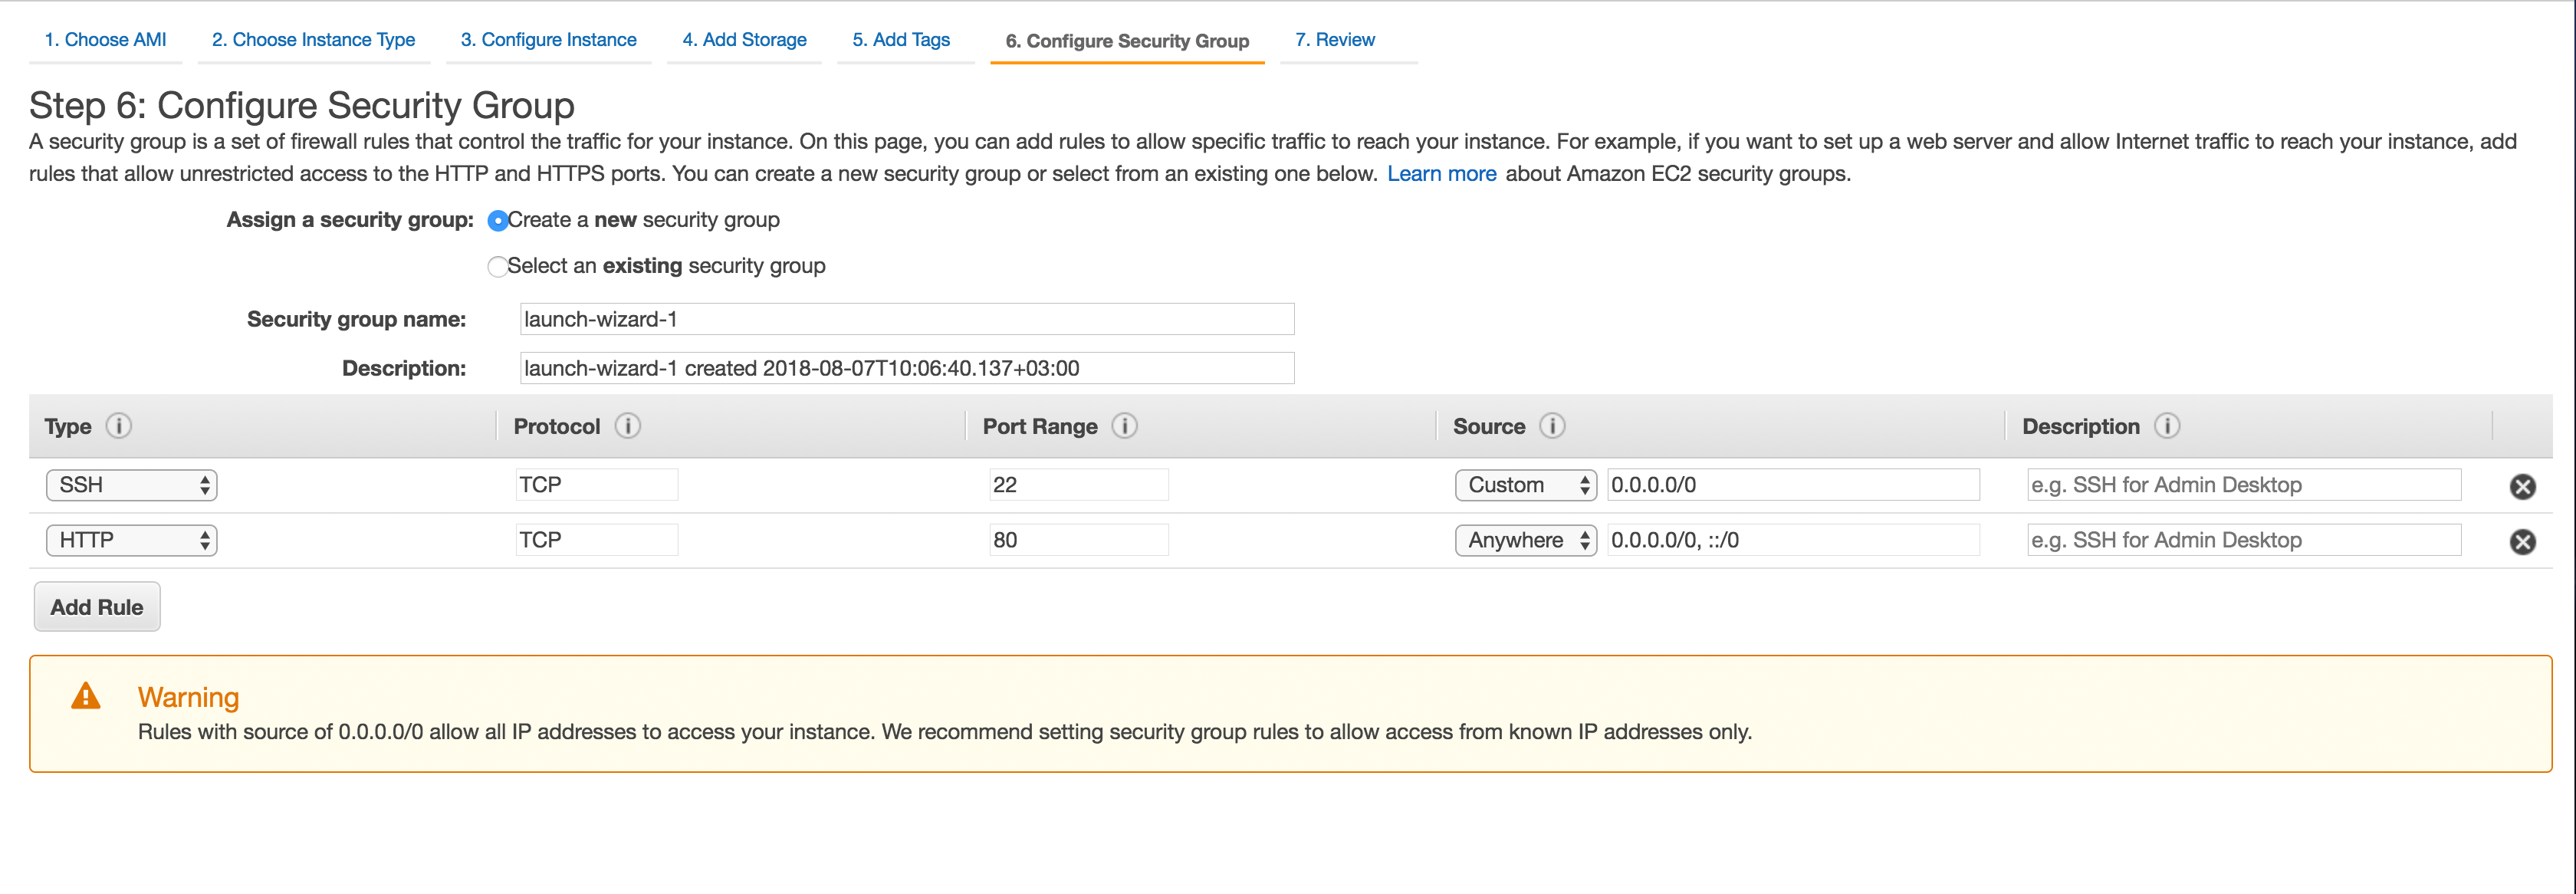
3. Configure security groups
Open the 80th port range of HTTP in the security groups. In the future, this port will be used by Nginx.
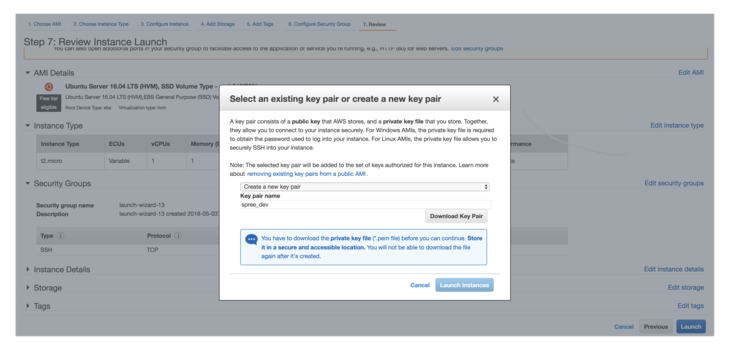
4. Review
Now you need to review the configuration. Before running your instance, create and download the spree_dev.pem key so you can access your server via SSH.
Add this key file to .gitignore:
Now you can see the information on the installed instance in your dashboard. For example, our server has received the following public IP address: 18.221.230.71. Your server will get a different address. This is why in places where you need to use the assigned IP address, we’ll write YOUR_IP_ADDRESS throughout this tutorial.
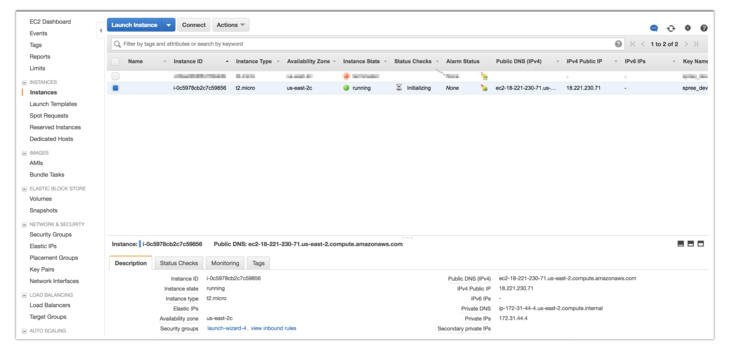
When the state of the instance changes from initializing to running, you can log in via SSH. Next, set the read permissions to the key that you’ve downloaded.
Then use this key to connect via SSH:
Once you’ve configured the instance with Chef, you no longer need to use the key.
Step 1. Initialize the project
First, you need to create the directory where you’ll place the configuration for your server in the form of Chef scripts.
Then create a Gemfile.
This Gemfile contains gems you’ll need when working with Chef.
Set up the gems.
After that, you can use the knife command to initialize the Chef repository to the current directory.
Your directory will now have the following structure:
You already know the components of Chef. But the added directories contain a .chef directory in which the file knife.rb is located. We use this file to specify configuration information for the knife client. By default, the knife client holds route configurations for the node, roles, and others. You can find more details about the configuration here.
Now we’re ready to start describing the configuration for our server.
Step 2. Data bags
At this stage, we’ll describe the data bags for the deployer user on whose behalf the application will be deployed.
To do this, create a directory called users. This directory will contain the JSON file with configurations for access to the server for each user.
The configuration for the user deployer looks like this:
To distinguish permissions, the Linux operating system has groups along with users. Just like a user, a group has access rights to certain directories and files. The list of groups is located under the groups key.
We’ll connect to the server via SSH. To do so, copy the contents of your public key file in the terminal.
On Linux, you can extract the contents and then copy it:
On macOS, the following command copies the output to the clipboard:
After doing this, replace SSH_PUBLIC_KEY with the output in data_bags/users/deployer.json.
Step 3. Environment
Now we’ll start describing the environment for configuring our server. Let’s look at the example of the dev environment.
We’ll create a configuration file for the dev environment.
Then we need to specify the default attributes.
Step 4. Node
Next, create a node for your server using your unique IP address in place of YOUR_IP_ADDRESS. In Chef, nodes are called by the IP address of the server to which the described configurations will be applied.
Create a configuration file for the node.
Then set the name, environment, run_list, and ipaddress attributes.
In this part of our guide, we’ve considered Infrastructure as Code approach and Chef automation platform and showed you the main components of the Chef repository. We’ve also set up the EC2 instance and described the basic configuration for it. In the next part of the guide, we'll teach you how to write your own cookbooks.
Keep in touch with our updates for the second part of the guide.


